1 / 3
Caption Text
2 / 3
Caption Two
3 / 3
Caption Three margin testing

Thursday, September 3, 2009

How to Use Remote Desktop in Ubuntu 8.10 (Intrepid Ibex)

How to Use Remote Desktop in Ubuntu 8.10 (Intrepid Ibex) | Ubuntu Geek

In this tutorial we will see how to enable remote desktop access in ubuntu desktop and accessing remotely.vino is VNC server for GNOME.VNC is a protocol that allows remote display of a user's desktop. This package provides a VNC server that integrates with GNOME, allowing you to export your running desktop to another computer for remote use or diagnosis.

By default ubuntu will come with vino-server so it is very easy to configure to enable remote desktop sharing in your ubuntu machine.If you want to access ubuntu machine remotely you need to login in to your ubuntu system.

Important note :-Remote Desktop will only work if there's a GNOME login session.Leaving your computer with an unattended GNOME login session is not secure and not recommended.

Enable Remote Desktop in Ubuntu

First you need to go to System -> Preferences -> Remote Desktop

Once it opens you should see similar to the following screen


In the above screen you need to configure remote desktop preferences for sharing and security

For Sharing

you need to tick the box next to the following two options

  • Allow other users to view your desktop
  • Allow other users to control your desktop

For Security

you need to tick the box next to the following two options

  • Ask you for confirmation (If you tick this option some one need to click on allow from remote desktop once it connected if you don't want you can untick this option)
  • Require the user to enter this password:
  • Password: Specify the password


Now you need to click on Advanced Tab select your options click on close

For Network

  • Only allow local connections
  • Use an alternative port
  • Disable the wallpaper when connected

For Security

  • Require encryption
  • Lock Screen on disconnect

For Notification Area

  • Always display icon
  • Only display an icon where there is someone connected
  • Never display an icon


Connecting from Ubuntu Machine

Go to Applications—>Internet—>Remote Desktop Viewer once it opens you shold see similar to the following screen and If you want to connect remote PC click on connect from top menu.

Enter you remote host or if you click on find

Now it should automatically detect the available remote desktops select your remote PC and click ok

You can see the remote host details and port number click on connect

Enter the remote host password to connect and click ok

Now you should be able to connect your remote desktop.In intrepid we have more security options to choose like you can encrypt complete session.

Connecting from Windows Machine

If you are trying to connect from your windows machine you need to install vncviewer of your choice i have installed from here http://www.realvnc.com/download.html.Install this program once you install this you can opem from start—>All programs—>RealVNC—>VNC Viewer 4—>Run VNC Viewer once it opens you should see the following screen here enter the remotemachine ipaddress:0 format and click ok.Now it will prompt for password enter your password and click ok

Now on the remote machine you should see the following screen asking for permission to allow this connection you need to click on allow this will come up only if you tick "Ask you for confirmation" option under sharing.

Installing Dropbox on Ubuntu 8.10

Installing Dropbox on Ubuntu 8.10 « the ubuntu experiment

First go to the Dropbox website and download the .deb package. Make sure you select the (x86) package.

Once the download is complete, double-click on it to start installation. When the installation is over you will need to restart Nautilus; you can do this by logging out and back in or by executing the following command in Terminal (Applications -> Accessories -> Terminal).

killall nautilus

Now you will see the Dropbox icon appear in the taskbar.

dropbox

Right-click on the icon and select "Start Dropbox". This starts the downloading of Dropbox. Sit back and wait until the download is complete.

downloading_dropbox

Once Dropbox has been downloaded the setup will begin. Follow the instructions on the screen and proceed.

dropbox_a

dropbox_b

dropbox_c

Note: By default your Dropbox will be in the directory "YourHomeFolder/Dropbox". If you want to choose another folder, you can tick "I want to choose where to put my Dropbbox" in this screen.

dropbox_d

Setup is now complete and you can start uploading and sharing files!

dropbox_done

This entry was posted on Thursday, January 22nd, 2009 at 1:30 pm and is filed under Ubuntu.

Wednesday, September 2, 2009

Take Your Work Into the Cloud With a Web OS

Take Your Work Into the Cloud With a Web OS - PC World

Web-based computers let you work on your files from any device without having to carry anything with you.

Robert Strohmeyer, PC World
Sep 1, 2009 5:45 pm

If you travel, use more than one computer for work, or depend on a smartphone for business, you might find it difficult to keep all your files in sync and up-to-date. But with a Web-based virtual computer, you can ensure that your data remains synced and organized across all your devices while using a single, consistent interface on every computer you work from. In this article I'll explain what a Web OS is, what the benefits are, and how you can put one to work.

What's a Web OS?

IcloudA Web OS, sometimes called a Webtop or a cloud computer, is a virtual machine that lives online--but when you're logged in to one, it can be nearly indistinguishable from a regular desktop OS. In most cases the menus and icons of a Web OS look similar to those of Windows, complete with a taskbar, a desktop with customizable wallpaper, a file browser, and productivity and communications apps. But because a Web OS doesn't reside on your local computer, you can access the same desktop--along with all your apps, files, and personal settings--on almost any device that has a Web browser.

Prominent examples of Web OSs include G.ho.st, Glide OS, and Icloud. For a comparison of these and other Web OS services, see Ian Paul's "9 Web-Based Office Productivity Suites." Because G.ho.st is my personal favorite, I'll be using it for most of this tutorial. The truth, however, is that no clear leader has arisen in the Webtops arena, and personal taste is an even greater factor in selecting the best Web OS for you than it is in choosing a favorite desktop OS.

Why Go With the Web?

For users who have only one computer, or who seldom need to share files between a work PC and a home PC, adding a Web OS into the mix will likely prove needlessly complicated. But if you move between multiple PCs often and you don't want to fret about syncing files all over the place, a Web OS can be even better than a thumb drive for storing everything and providing a consistent experience across multiple platforms.

In the process of writing this article, I sat in front of at least three different computers running two different operating systems. (And not just to prove a point about Web OSs, either.) But because I used G.ho.st, at any time I could easily move to a different PC, boot it up, log in, and pick up where I had left off. All of my icons were in the same place, and all of the apps and menus were the same. And because all of that sits on a remote Web server, I didn't have to worry about forgetting my thumb drive when I moved from my home office to my office office.

In addition to its persistent browser-based interface, G.ho.st comes in a mobile version that lets you download your files from a smartphone in a pinch.

One big advantage of a Web OS is that its performance doesn't depend much on the speed of your computer. This makes such a setup great for use on an aging laptop or an underpowered netbook. Web OS performance will, however, depend a great deal on the speed of your Internet connection, especially if you're transferring files back and forth, so be sure you have a reliable broadband service or you'll experience sluggish response times from your cloud-based apps.

Get Started

You don't need much to start using a Web OS right now. Once you've chosen a service, just visit its site from any Internet-connected desktop or laptop computer and sign up for a free account. After a quick registration, you'll be staring at your new virtual desktop for the first time.

G.ho.st desktopWhile the interfaces for different Web OS services vary slightly, they tend to follow the basic layout that Windows popularized. In G.ho.st, the taskbar runs across the bottom of the screen just as it does in Windows, and a Go button is located where the Start button would be. You'll also find a Quick Launch bar just to the right of the Go button, and a system tray to the far right of the taskbar.

The G.ho.st desktop gives you rapid access to a few of the most important features of your virtual machine, including a link to all of your programs, the control panel, mail, and an instant messenger application that supports AIM, Google Talk, ICQ, MSN Messenger, and Yahoo Messenger. Want to get started with a text document or spreadsheet right away? Launch Zoho Writer or Zoho Sheets directly from the desktop and start typing. You might also try the 'Take the Tour' link on the desktop, which will get you oriented quickly.

File Management

Assuming that you don't plan on using your Web OS as your primary PC all the time, you'll want to start managing your files intelligently from the moment you log on. While you certainly can just upload files from your desktop to the Web OS one by one, or even in batches, the better approach is to use the built-in syncing features to manage files on all your machines automatically.

G.ho.st SyncIn G.ho.st, you'll find the appropriately named Sync utility, available in both Windows and Mac versions from the Ghost Services menu. Select the version for the computer you happen to be using, and download and run the installer. Afterward, enter your log-in info and set the options as you see fit. The best choice is to sync in both directions and set conflict resolution to keep the newest version of each file. You can also choose to simply append "~deleted" to the file names of old versions, which can prevent you from losing important data if something goes wrong.

G.ho.st Lite on iPhoneMobile Access

Though not all Webtops offer a mobile version of their services, G.ho.st does. However, not all of the service's features will work in all mobile browsers. Be sure that your phone supports JavaScript and that the feature is enabled; otherwise you won't be able to download your files to the device. To work with the files once you've download them, you'll need an editing program and/or a viewing app installed on your mobile device.

Online Language Classes Work, Research Shows

UC Davis News & Information :: Online Language Classes Work, Research Shows

August 24, 2009

Online foreign-language instruction can be as effective as classroom instruction, according to research from the University of California Consortium for Language Learning and Teaching.

"Distance learning of a foreign language can be a responsible and equivalent option to the classroom experience," said consortium director Robert Blake, a professor of Spanish at UC Davis. "Rather than continue to argue about whether it works, let's decide how we want to marshal our resources and how we want to use it."

Blake has conducted two recent studies of distance learning of Spanish. One looked at a course taught entirely online through UC Davis Extension. The other assessed a blended course combining distance and classroom instruction offered by the UC Davis Department of Spanish.

In the first study, published in the October 2008 issue of the journal Language Learning & Technology, Blake found that students in the online-only and hybrid format courses achieved oral Spanish proficiency in their first year of study comparable to that of students in traditional courses.

In the second study, presented this spring at the annual meeting of the Computer Assisted Language Instruction Consortium in Tempe, Ariz., Blake identified three student characteristics that appear to be crucial to a successful online learning experience: self-discipline, an ability to collaborate in groups, and an auditory/kinetic learning style.

In addition to Spanish Without Walls through UC Davis Extension, Blake has developed an Arabic Without Walls course that will be offered through UC Irvine this fall. He is also working on a distance-learning course in Punjabi with a professor at UC Santa Barbara.

"Distance-learning and hybrid formats have tremendous potential to address increasing societal pressures to help second-language learners reach advanced proficiency, especially in less commonly taught languages where access is a key issue," Blake said.

Distance learning may also help to meet the demand for introductory foreign language classes on college campuses. Beginning this fall, Spanish Without Walls students at UC Davis will be eligible to earn both extension and college credit.

"This means students could satisfy their undergraduate language requirement entirely through distance learning," Blake said.

Additional information:

Media contact(s):

Thursday, August 27, 2009

SSHMenu – Manage SSH Connections from the Panel

SSH Menu – Save and Open SSH Connections from the Panel « Ubuntu Blog

I was looking for a replacement for SecureCRT in Ubuntu. Something that would let me save all my SSH connections and make it possible to open a connection with the least effort.

As is often the case, I found something better than SecureCRT – a panel applet for GNOME that gives me a drop-down list of SSH connections. SSHMenu is cool, way too cool.


SSH Menu

Above, you can see my list of ssh accounts in all their glory. A connection is just a click away.

When you set up the connections, you can specify the geometry – ie, where on your desktop you want the gnome-terminal window to pop up, as well as a "profile" for the gnome-terminal instance – very handy if you want to have different color schemes for different ssh accounts to be able to distinguish between them better.


SSH Menu Options

What's even better is, in the "Hostname (etc)" field, you can prepend ssh options to the hostname. The figure below shows my port forwarding setup for IRC at school, since I can't chat using port 6667 at school.


SSHMenu Account Options

There's a Debian/Ubuntu repository for SSHMenu, and of course, nothing stops you from downloading the .deb packages and installing them if you don't wish to add another repository to you list of repositories.

Once you get SSHMenu installed, you can add it to your panel by right-clicking on your GNOME panel, and selecting "Add to Panel". SSHMenu should be listed as "SSH Menu Applet" under the "Utilities" section. Then all you have to do is use the tool to add accounts that pops-up when you install the applet, or add the accounts later by clicking on the "SSH" in your panel. However, this still doesn't take us to "one-click" login, since you will be prompted for your password by the server you are trying to connect to.

To make the connections truly one-click (or two-click), you might want to setup password-less logins using ssh-keygen and ssh-copy-id. A quick overview of that process follows:
On your local computer, type:


$ssh-keygen -t rsa

Enter a password here. Then when you try to connect to the accounts using SSHMenu, you will asked for the password only once, the very first time. (Thanks to Grant, SSHMenu's author for the explanation in the comments).

Once your RSA key-pair is generated, you need to add the public key to your server's ~/.ssh/authorized_keys file. You can do this very easily by typing (on your local computer):


$ssh-copy-id -i ~/.ssh/id_rsa.pub username@example.com

This will copy your public key for the just-generated RSA keypair to the example.com ssh account, where your username is "username".


Of course, for this passwordless login to work, the server needs to accept this method of authentication. There's an old article at the Debian Administration blog that describes the process in a little more detail, and countless others have written about this, so you won't have trouble finding info.

SSH without password on Ubuntu

Ssh without password | Linux4All.Net

Using the below steps, you can ssh to the server from client without the entering any password.

Run the following command on the client

-> ssh-keygen -t dsa
Enter a password here. Then when you try to connect to the accounts using SSHMenu, you will be asked for the password only once, the very first time. File id_dsa and id_dsa.pub will be created inside $HOME/.ssh

Copy the id_dsa.pub to the server's ~/.ssh directory
-> ssh-copy-id -i ~/.ssh/id_dsa.pub user@server

You can try ssh to the server from the client and no password will be needed
-> ssh user@server
Here you will be asked for the password, only once at the first time.

Create the file ~/.ssh/config, and customize your servers uniqely within it.
Host server
Hostname 192.168.170.254
User user
Now you can login with this command:
-> ssh server

How To Set A Static IP On Ubuntu 8.10

How To Set A Static IP On Ubuntu 8.10 » Linhost.info

November 12th, 2008 by Luis Ventura

Known network manager bug https://bugs.edge.launchpad.net/ubuntu/+source/network-manager/+bug/284298

Due to a bug if you want to assign a static IP on Ubuntu 8.10 Desktop your setting will be overwritten after the next reboot because of a bug that escaped the Ubuntu team. The bug is annoying and silly that something so basic would escape the development team.

Any way there are two solutions one uses the command line and the second one the GUI.

First Solution

First solution is to get down and dirty with the command line, it takes less than 2 minutes. Edit /etc/network/interfaces and enter the following values.

sudo nano /etc/network/interfaces
# The primary network interface auto eth0 iface eth0 inet static address 192.168.1.3 network 192.168.1.0 netmask 255.255.255.0 broadcast 192.168.1.255 gateway 192.168.1.1

And save it.

Now move on to edit the /etc/resolv.conf. And add the name server.

sudo nano /etc/resolv.conf
nameserver 192.168.1.1

If you don't want to reboot the system restart the networking service instead.

sudo /etc/init.d/networking restart

Second Solution

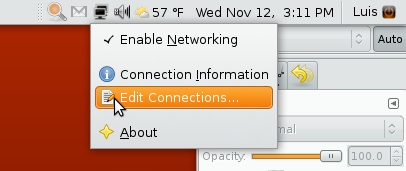
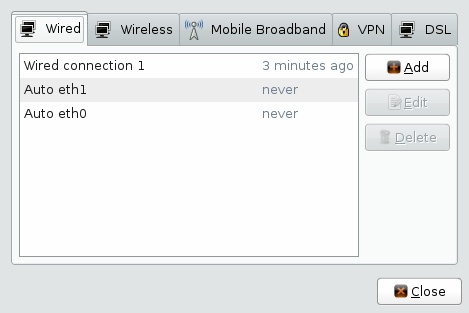
  1. Right click on the network icon located in the top panel. Select Edit Connections…
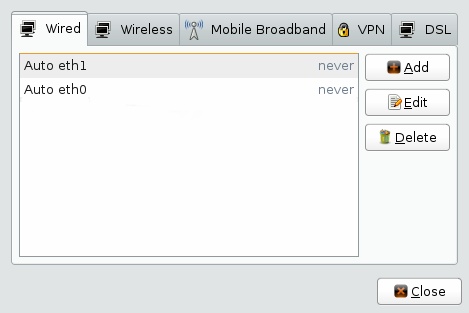
  2. Right click on Add. This is when we add the new configuration.
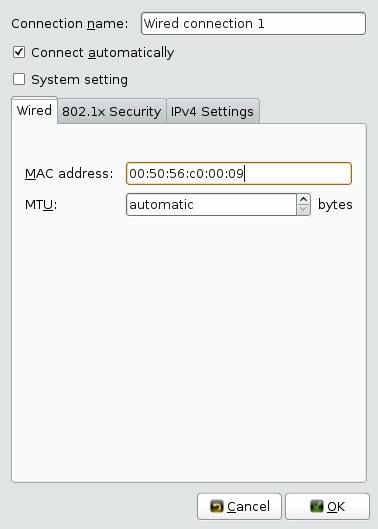
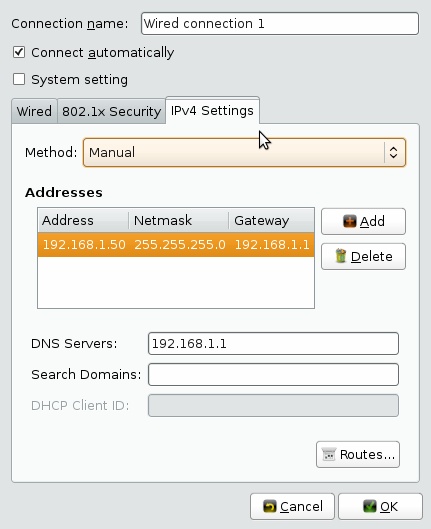
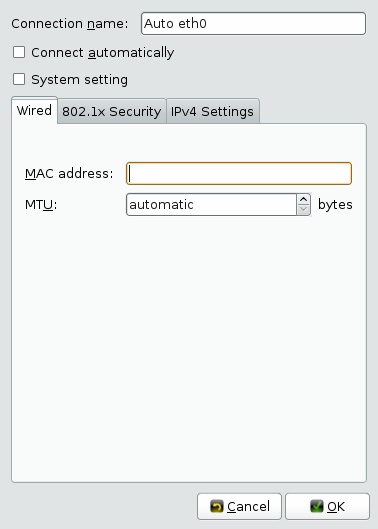
  3. Now you are presented with empty fields. Check Connect automatically at the top, otherwise the older configuration will take over. For the configuration to work you need to provide the MAC address of your network interface card in my case it's eth0.Tip : Issue ifconfig in the command line and copy and paste the resulting MAC address.
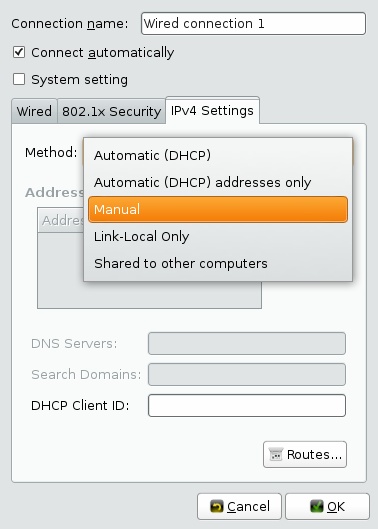
  4. In the same windows select the IPv4 Setting tab, the drop down menu will offer various option select Manual.
  5. After selecting Manual you have to provide the IP Address, Netmask, Gateway and DNS Server. Now click OK to save the settings.
  6. Now the new connection named "Wired connection 1″ is available.
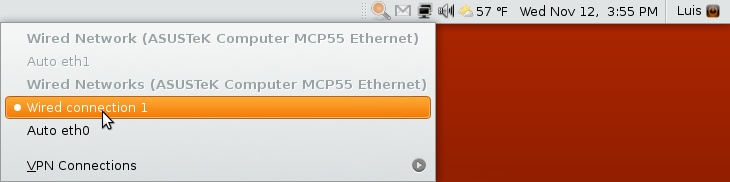
  7. Go back to the network icon located in the top panel and right click on it. Wired Connection 1 is now an option right click on it. The system will now change from the previous interface configuration the the new one.Tip : To verify the changes issue the ifconfig command.
  8. The last and perhaps most important step is to go back in to Edit Connections… and unchecked the Connect automatically option on Auto eth0 which is the previous faulty Ubuntu configuration. Failure to do so will result in the Auto eth0 taking over the new configuration on the next reboot.

Featured Post

Windows和Ubuntu双系统完全独立的安装方法

http://www.ubuntuhome.com/windows-and-ubuntu-install.html  | Ubuntu Home Posted by Snow on 2012/06/25 安装Windows和Ubuntu双系统时,很多人喜欢先安装windows,然...