Alibaba.com, a global leader in ecommerce solutions for small- and medium-sized businesses recently annouced the acquisition of Vendio, an ecommerce solutions provider allowing SMBs to manage sales across multiple platforms.
With the purchase, Alibaba gains an additional 80,000 customers as it looks to expand its appeal as a global leader in SMB ecommerce. Current Alibaba customers can now implement Vendio solutions into their ecommerce operations. Among the most successful features of Vendo solutions are mobile storefronts and payment methods allowing for multiple currencies. For SMBs, these are invaluable items known to expand business and encourage growth.
"At Alibaba.com, our goal is to make it easier for our customers around the world to do business by providing solutions that increase margins, productivity and competitiveness through ecommerce," David Wei, chief executive officer of Alibaba.com, said. "We continue to look for synergies and investment opportunities to grow our customer base, acquire additional technology and add new applications that will help our customer base grow and prosper."
SMBs that fail to leverage the growth of ecommerce solutions will likely struggle to compete with their competitors. According to Forrester Research, ecommerce will become a $250-billion-per-year industry by 2015.


Monday, June 28, 2010
Alibaba.com continues push to take over global ecommerce

Sunday, June 27, 2010
虚拟主机安装Dropbox备份网站的教程
虽然目前从国内访问Dropbox有小小困难,但是从国外访问还是正常的,对于拥有国外Linux虚拟主机的用户,可能会遇到这样的需求,就是如何将国外虚拟主机上的网站备份到Dropbox上,下面我以Dreamhost为例介绍一下备份的方法。
你需要有一个国外的虚拟主机,虚拟主机需要有SSH权限,并能访问外网,符合这样条件的虚拟主机有一些,例如Dreamhost这类主机。
使用SSH帐号登录到你的主机地址,之后执行下面的命令:
wget -O dropbox.tar.gz http://www.dropbox.com/download/?plat=lnx.x86
下载完成文件后,接着,你可以执行下面的命令将其解压缩:
tar -zxof dropbox.tar.gz
接着执行下面的命令将Dropbox程序转移到~目录。
mv .dropbox-dist ~
现在,执行下面的程序即可后台运行Dropbox
~/.dropbox-dist/dropboxd &
第一次执行这个程序的时候,dropboxd会显示一串很长的URL地址,你需要手动在浏览器中执行这个地址,才能将虚拟主机服务器连接到Dropbox,执行完后,Dropbox的Events中会显示"The computer xxx was linked to your account",表明该服务器已经连接好。
这时候,你的根目录下会出现一个Dropbox目录,并会自动下载,你可以使用下面命令进入你的Dropbox目录
cd ~/Dropbox
接着,将你的网站目录通过cp -r命令复制到~/Dropbox目录下,就能实现网站的同步备份了。
如果你想停止运行Dropbox,可以通过下面的命令实现:
killall dropbox
对于Dreamhost用户来说,其实你一退出SSH,dropbox就会自动退出,你要想让dropbox一直运行,估计要购买价格更高的VPS才行,或者就是用一个程序自动挂着SSH也行。
最后赞一下Dropbox的速度,在国外的主机上执行Dropbox真快的吓人,几个G的文件,不到半个小时就全部下载更新完毕,这和国内完全不是一个速度啊,我昨天在国内同步几个G的文件,至少要花整整两天的时间。
参考文章:How To Install Dropbox In An Entirely Text Based Linux Environment
Friday, June 25, 2010
Chinese ecommerce comes to US
Linking suppliers and sellers
Posted in Small Biz, 25th June 2010 10:07 GMT
Free whitepaper – A Smart Path to Virtualization
Chinese small business trading site Alibaba has made its first US acquistion - buying Vendio Services which provides eBay listing tools, ecommerce and online selling platforms for small firms.
Alibaba, and AliExpress.com, is a massive database of potential suppliers. Now Vendio's 80,000 small business customers will soon have easy access to Chinese suppliers.
The idea is that Vendio customers will be able to source supplies from AliExpress then use Vendio services to
flog the stuff on eBay, other ecommerce sites or even their own sites.David Wei, chief executive of Alibaba.com, said the deal would make it easier for its customers to do business around the world. He also said the company was still looking for other possible purchases to grow its customer base and add technology.
Wie said: "The connection of Vendio with Alibaba.com will completely integrate the e-commerce value chain between the B2B and B2C platforms, fully realizing the B2B2C model. I am confident that our complementary businesses will create enhanced opportunities for our customers."
Financial terms were not released but Alibaba did say the deal was part of a $100m investment in AliExpress this year. ®
Thursday, June 24, 2010
Setting up ubuntu 10.04 (Lucid) server with squid 3 as a Transparent Proxy
Thanks to Jayson for this guide
Complete Steps in Setting up UBUNTU Server 10 with SQUID 3 as a Transparent Proxy.
Step 1. Install the Ubuntu Server 10, include LAMP if you want
Step 2. Change the network interfaces from dhcp to static
sudo nano /etc/network/interfaces
auto eth0
iface eth0 inet static
address 192.168.1.250
netmask 255.255.255.0
network 192.168.1.0
broadcast 192.168.1.255
gateway 192.168.1.88
post-up iptables-restore < /etc/iptables.up.rules
auto eth1
iface eth1 inet static
address 192.168.2.1
netmask 255.255.255.0
network 192.168.2.0
broadcast 192.168.2.255
Step 3. Install Web Admin (webmin) (Optional)
wget http://prdownloads.sourceforge.net/webadmin/webmin_1.510-2_all.deb
dpkg –install webmin_1.510-2_all.deb
sudo apt-get -f install
https://localhost-IP ADDRES:10000
*Note Make sure you give permission to the IPTABLES ruleset to for you to access webmin over the net.
Step 4. Install ClamAV and ClamAV-freshclam
sudo apt-get install clamav clamav-freshclam
Step 5. The first step is to install squid 3
sudo apt-get install squid3
edit the squid 3 configuration file in your favorite editor
sudo nano /etc/squid3/squid.conf
and set the transparency and the allowed hosts
http_port 3128 transparent
acl our_networks src 192.168.2.0/24
acl localnet src 127.0.0.1/255.255.255.255
http_access allow our_networks
http_access allow localnet
where 192.168.2.0/24 is the IP range of local network. Probably you need to adjust the swap size
cache_dir ufs /var/spool/squid3 7000 16 256
here the first number denotes the size of cache in megabytes. Save you changes and restart the squid proxy by
sudo /etc/init.d/squid3 restart
Step 6. Edit the /etc/sysctl.conf
sudo nano /etc/sysctl.conf
Uncomment the line that enable packet forwarding for IPv4 and IPv6
Net.ipv4.ip_forward = 1
Net.ipv6.conf.all.forwarding = 1
Step 7. Edit the IPTABLE ruleset of NAT and FILTER
sudo nano /etc/iptables.up.rules
*nat
-A PREROUTING –i eth1 –p tcp –m tcp –dport 80 –j DNAT –to-destination 192.168.2.1:3128
-A PREROUTING –i eth1 –p tcp –m tcp –dport 80 –j REDIRECT –to-ports 3128
-A POSTROUTING –s 192.168.2.0/24 –o eth0 –j MASQUERADE
*filter
-A INPUT –i lo –j ACCEPT
-A INPUT –m state –i eth0 –state REALATED,ESTABLISHED –j ACCEPT
-A INPUT eth1 –j ACCEPT
-A INPUT –p tcp –m tcp –dport 22 –j ACCEPT # permit ssh using putty
-A INPUT –p tcp –m tcp –dport 10000 –j ACCEPT # permit webmin access
-A INPUT –j LOG
-A INPUT –j DROP
-A FORWARD –i eth1 –j ACCEPT
-A OUTPUT –o lo –j ACCEPT
-A OUTPUT –o eth1 –j ACCEPT
-A FOWARD –o eth1 –j ACCEPT
-A FORWARD –s 192.168.2.0/24 –o eth0 –j ACCEPT
-A FORWARD –d 192.168.2.0/24 –m state –state ESTABLISHED,REALTED –I eth0 –j ACCEPT
STEP 8. Edit rc.local
sudo nano /etc/rc.local
iptables -t nat -A POSTROUTING -s 192.168.2.0/24 –o eth0 -j MASQUERADE
Step 9. reboot the server
Step 10. Configure the workstation for static IP Address making the LAN IP of the Ubuntu box as the gateway. Make sure that the IP Address of the work station is within the network you setup.
Tuesday, June 22, 2010
Install Subversion and Subclipse for Eclipse on Ubuntu
If you do not have Eclipse installed yet, run:
sudo apt-get install eclipse Install Subversion
sudo apt-get install subversionInstall the Subversion plugin for Eclipse
Get the Java bindings for Subversion:
sudo apt-get install libsvn-javaNow we are ready to install the plugins in Eclipse.
Open Eclipse.
Go to Help -> Install New Software
Then hit the "Add" button.
Put "Subclipse 1.6.x (Eclipse 3.2+)" under Name and "http://subclipse.tigris.org/update_1.6.x" under Location:
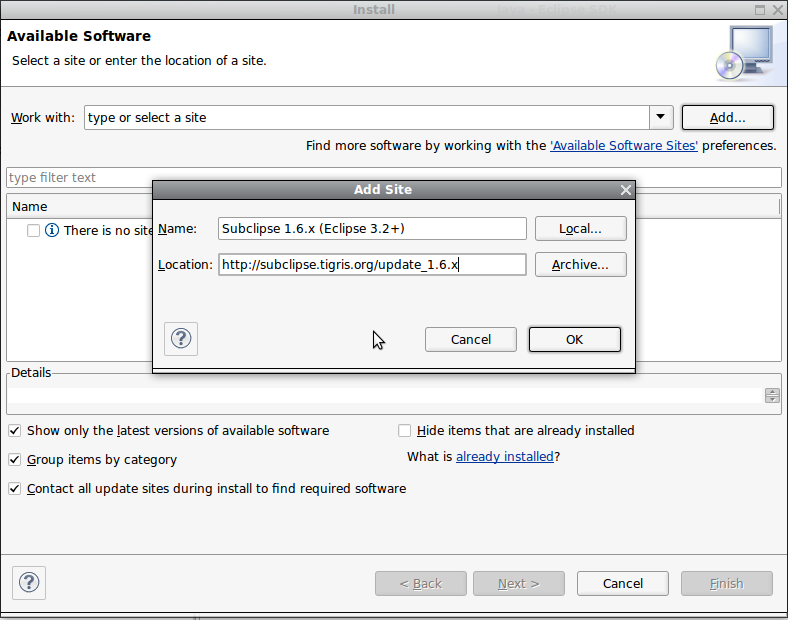
Add the libraries for Subclipse
The above is for Elclips 3.2+ and Subversion 1.6.x.
If you have different Eclipse or Subversion versions, check this list and substitute accordingly:
Name: Subclipse 1.6.x (Eclipse 3.2+)
URL: http://subclipse.tigris.org/update_1.6.x
Name: Subclipse 1.4.x (Eclipse 3.2+)
URL: http://subclipse.tigris.org/update_1.4.x
Name: Subclipse 1.2.x (Eclipse 3.2+)
URL: http://subclipse.tigris.org/update_1.2.x
Name: Subclipse 1.0.x (Eclipse 3.0/3.1)
URL: http://subclipse.tigris.org/update_1.0.x
More info about the different versions: http://subclipse.tigris.org/servlets/ProjectProcess?pageID=p4wYuA
Then hit "OK". You will now be presented with these options:
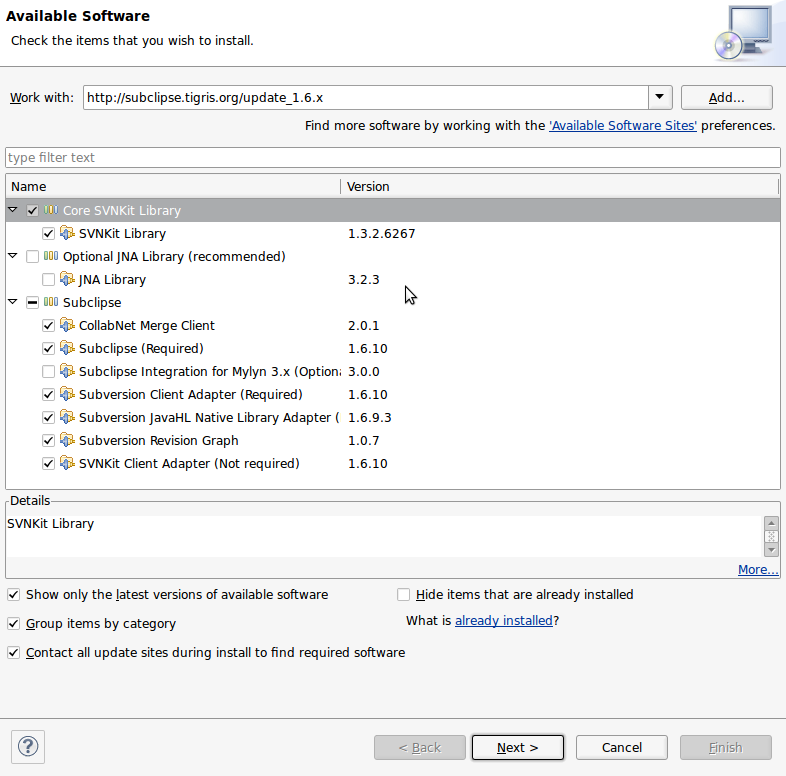
Subclipse Installation Options
If you are unsure what Subclipse component you will need, you can check all of them. Also, keep in mind that you can always go back to this in the future and install/uninstall any of the components as needed.
Then "Next" and "Finish" on the subsequent screens.
After the plugins are installed, it will prompt you to restart Eclipse. Go ahead and do so.
You are not done yet. You need to fix the JavaHL.
Edit the eclipse.ini file:
sudo vi /usr/lib/eclipse/eclipse.iniAdd the following line under -vmargs:
-Djava.library.path=/usr/lib/jni
Here is what my eclipse.ini file looks like:
$ cat /usr/lib/eclipse/eclipse.ini -startup plugins/org.eclipse.equinox.launcher_1.0.201.R35x_v20090715.jar --launcher.library plugins/org.eclipse.equinox.launcher.gtk.linux.x86_1.0.200.v20090520 -showsplash org.eclipse.platform --launcher.XXMaxPermSize 256m -startup --launcher.library -showsplash org.eclipse.platform --launcher.XXMaxPermSize 256m -startup /usr/lib/eclipse/plugins/org.eclipse.equinox.launcher_1.0.201.R35x_v20090715.jar --launcher.library /usr/lib/eclipse/plugins/org.eclipse.equinox.launcher.gtk.linux.x86_1.0.200.v20090520 -vmargs -Djava.library.path=/usr/lib/jni -Dorg.eclipse.equinox.p2.reconciler.dropins.directory=//usr/share/eclipse/dropins -Xms40m -Xmx256m -Dorg.eclipse.equinox.p2.reconciler.dropins.directory=//usr/share/eclipse/dropinsFor more info on fixing JavaHL if you need it: http://subclipse.tigris.org/wiki/JavaHL#head-bb1dd50f9ec2f0d8c32246430c00e237d27a04fe
You should be able to use Subversion with Eclipse for your projects at this point.
GSmartControl - Hard disk drive health inspection tool
Monday, June 21, 2010
Creating Local SVN Repository (Home Repository) for a Single Developer
In this tutorial I will explain how to create a local Subversion (SVN) repository, intended for a single user. I assume that you already know the benefits of keeping track of old revision of projects or important documents such as a resume or a thesis you have been writing. Subversion offers you a very convenient yet strong method to do so, and the easiest way to do so with Subversion (SVN) is to create a local, home, repository intended for a single user – you. The repository we are going to create will be used by a single user, working locally on the machine. In this tutorial I will assume the repository will be created for a project called "project1″. "project1″ can be a real project you are doing, a paper you are writing or any thing else that can be stored under revision control (that almost everything).
Creating the repository
We will start by creating the repository. From the command line do the following:
In the first line we create a directory to house all of your repositories (I assume you are working under the username "user"). I prefer to use different repositories for different projects that are unrelated, no matter how small they are. Because I use many repositories, I prefer to have a single directory underneath all repositories will reside in an organized way (i.e. no junk files or any other kind of stuff except directories). Next thing, is to cd into the directory we created, and actually create the repository using the svnadmin command. To repository we've created is called "project1″.
The brand new "project1″ repository is currently empty and in revision 0. This will change once we put some data in it. The first thing you do with a new repository is to import initial project data into it.
Will import the current project1's file into the repository (assuming that project1 indeed resides in/home/user/project1). The trunk appended to the end of the repository URL, is part of the directory layout convention used by many Subversion users. The last part of the command is the message that will be attached to the import in the SVN log.
Now the repository holds data and you are ready to checkout the code from it, and start working.
Checkout a Working Copy and Start Working
When using SVN (as well as in most revision control systems) you don't work directly on the repository. Instead you checkout a working copy from it, and work on this copy. To checkout a working copy from the repository, use:
This will create a working copy of the repository under /home/user/project1_work. You can edit this copy safely.
After you've done editing your working copy, you will want to commit those changes back to the repository. Assuming you are already inside the directory of the working copy, just do:
This will send you changes back to the repository and store them there. Change the "Some log message" to some useful short description of the changes you've made.
Some Useful Commands
To view a list of log messages that were attached to the operations on the repository, use:
The first command will print all log messages. The second command will print the log messages from revision 5 to the latest revision. You can substitute the HEAD with a number to get the log messages of the revisions up to a specific one.
To view the changes you made before committing your code, use:
Another important command is the one to update your working copy with the latest revision from the repository. This can be done using:
However, since your are the only user of the local repository, you won't have to use this function often (if at all), unless you use two, or more, working copies for your project.
This concludes this tutorial. I hope you know by now how to create and use, a single user local SVN repository.
Featured Post
Windows和Ubuntu双系统完全独立的安装方法
http://www.ubuntuhome.com/windows-and-ubuntu-install.html | Ubuntu Home Posted by Snow on 2012/06/25 安装Windows和Ubuntu双系统时,很多人喜欢先安装windows,然...

-
http://www.williamlong.info/archives/3125.html -月光博客 互联网精准广告定向技术,指的是依托于搜索引擎庞大的网民行为数据库,对网民几乎所有上网行为进行个性化的深度分析,按广告主需求锁定目标受众,进行一对一传播,提供多通道投放,按照效...
-
VOA News A wine-tasting near Beijing, China Finally, a listener in Taiwan wrote to ask why his face turns red when he drinks alcohol. Th...
-
Companion Website for: Word Frequencies in Written and Spoken English Word Frequencies in Written and Spoken English: based on the British N...


