1 / 3
Caption Text
2 / 3
Caption Two
3 / 3
Caption Three margin testing

Thursday, August 27, 2009

SSHMenu – Manage SSH Connections from the Panel

SSH Menu – Save and Open SSH Connections from the Panel « Ubuntu Blog

I was looking for a replacement for SecureCRT in Ubuntu. Something that would let me save all my SSH connections and make it possible to open a connection with the least effort.

As is often the case, I found something better than SecureCRT – a panel applet for GNOME that gives me a drop-down list of SSH connections. SSHMenu is cool, way too cool.


SSH Menu

Above, you can see my list of ssh accounts in all their glory. A connection is just a click away.

When you set up the connections, you can specify the geometry – ie, where on your desktop you want the gnome-terminal window to pop up, as well as a "profile" for the gnome-terminal instance – very handy if you want to have different color schemes for different ssh accounts to be able to distinguish between them better.


SSH Menu Options

What's even better is, in the "Hostname (etc)" field, you can prepend ssh options to the hostname. The figure below shows my port forwarding setup for IRC at school, since I can't chat using port 6667 at school.


SSHMenu Account Options

There's a Debian/Ubuntu repository for SSHMenu, and of course, nothing stops you from downloading the .deb packages and installing them if you don't wish to add another repository to you list of repositories.

Once you get SSHMenu installed, you can add it to your panel by right-clicking on your GNOME panel, and selecting "Add to Panel". SSHMenu should be listed as "SSH Menu Applet" under the "Utilities" section. Then all you have to do is use the tool to add accounts that pops-up when you install the applet, or add the accounts later by clicking on the "SSH" in your panel. However, this still doesn't take us to "one-click" login, since you will be prompted for your password by the server you are trying to connect to.

To make the connections truly one-click (or two-click), you might want to setup password-less logins using ssh-keygen and ssh-copy-id. A quick overview of that process follows:
On your local computer, type:


$ssh-keygen -t rsa

Enter a password here. Then when you try to connect to the accounts using SSHMenu, you will asked for the password only once, the very first time. (Thanks to Grant, SSHMenu's author for the explanation in the comments).

Once your RSA key-pair is generated, you need to add the public key to your server's ~/.ssh/authorized_keys file. You can do this very easily by typing (on your local computer):


$ssh-copy-id -i ~/.ssh/id_rsa.pub username@example.com

This will copy your public key for the just-generated RSA keypair to the example.com ssh account, where your username is "username".


Of course, for this passwordless login to work, the server needs to accept this method of authentication. There's an old article at the Debian Administration blog that describes the process in a little more detail, and countless others have written about this, so you won't have trouble finding info.
SSH without password on Ubuntu

Ssh without password | Linux4All.Net

Using the below steps, you can ssh to the server from client without the entering any password.

Run the following command on the client

-> ssh-keygen -t dsa
Enter a password here. Then when you try to connect to the accounts using SSHMenu, you will be asked for the password only once, the very first time. File id_dsa and id_dsa.pub will be created inside $HOME/.ssh

Copy the id_dsa.pub to the server's ~/.ssh directory
-> ssh-copy-id -i ~/.ssh/id_dsa.pub user@server

You can try ssh to the server from the client and no password will be needed
-> ssh user@server
Here you will be asked for the password, only once at the first time.

Create the file ~/.ssh/config, and customize your servers uniqely within it.
Host server
Hostname 192.168.170.254
User user
Now you can login with this command:
-> ssh server

How To Set A Static IP On Ubuntu 8.10

How To Set A Static IP On Ubuntu 8.10 » Linhost.info

November 12th, 2008 by Luis Ventura

Known network manager bug https://bugs.edge.launchpad.net/ubuntu/+source/network-manager/+bug/284298

Due to a bug if you want to assign a static IP on Ubuntu 8.10 Desktop your setting will be overwritten after the next reboot because of a bug that escaped the Ubuntu team. The bug is annoying and silly that something so basic would escape the development team.

Any way there are two solutions one uses the command line and the second one the GUI.

First Solution

First solution is to get down and dirty with the command line, it takes less than 2 minutes. Edit /etc/network/interfaces and enter the following values.

sudo nano /etc/network/interfaces
# The primary network interface auto eth0 iface eth0 inet static address 192.168.1.3 network 192.168.1.0 netmask 255.255.255.0 broadcast 192.168.1.255 gateway 192.168.1.1

And save it.

Now move on to edit the /etc/resolv.conf. And add the name server.

sudo nano /etc/resolv.conf
nameserver 192.168.1.1

If you don't want to reboot the system restart the networking service instead.

sudo /etc/init.d/networking restart

Second Solution

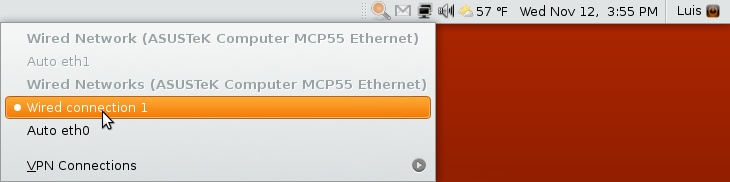
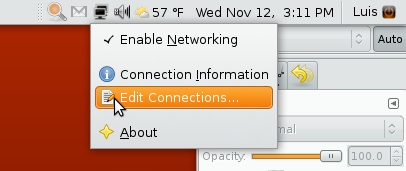
  1. Right click on the network icon located in the top panel. Select Edit Connections…
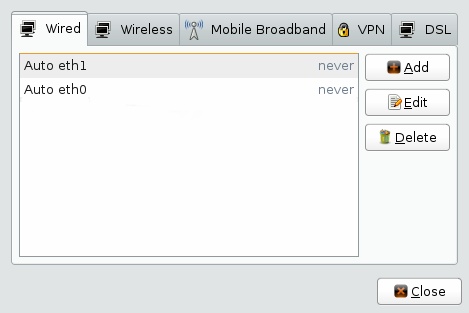
  2. Right click on Add. This is when we add the new configuration.
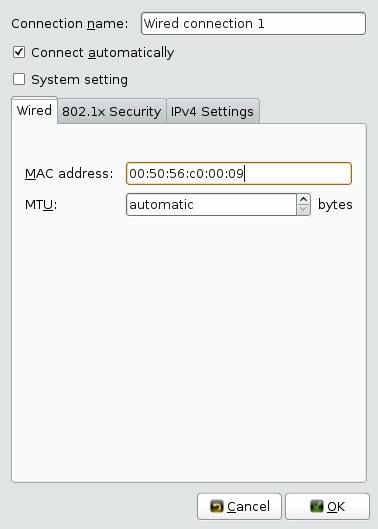
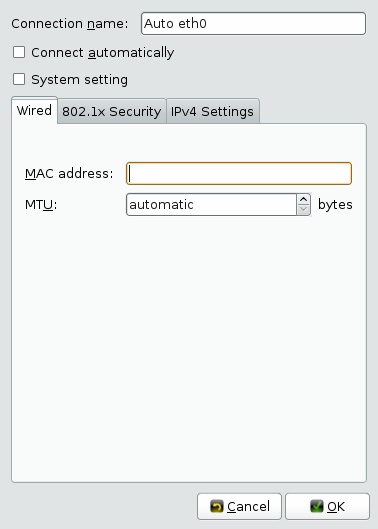
  3. Now you are presented with empty fields. Check Connect automatically at the top, otherwise the older configuration will take over. For the configuration to work you need to provide the MAC address of your network interface card in my case it's eth0.Tip : Issue ifconfig in the command line and copy and paste the resulting MAC address.
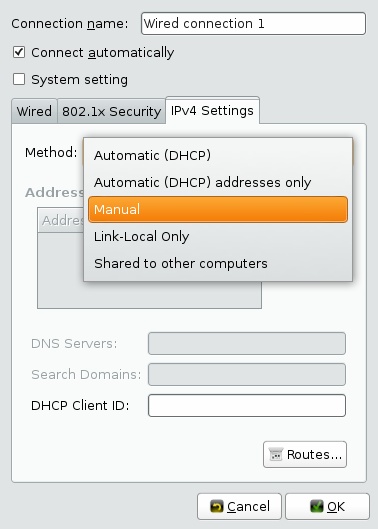
  4. In the same windows select the IPv4 Setting tab, the drop down menu will offer various option select Manual.
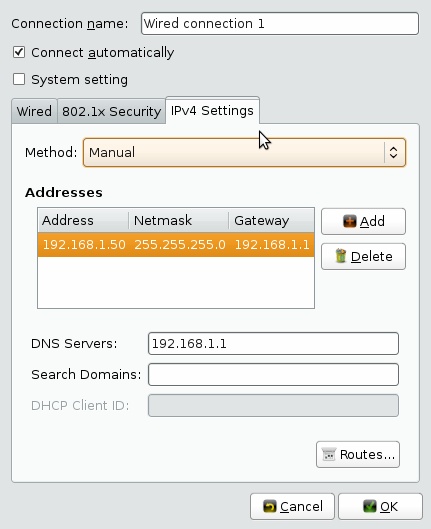
  5. After selecting Manual you have to provide the IP Address, Netmask, Gateway and DNS Server. Now click OK to save the settings.
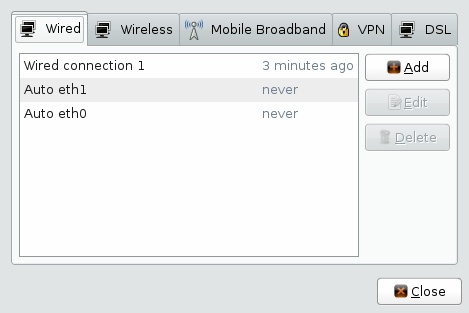
  6. Now the new connection named "Wired connection 1″ is available.
  7. Go back to the network icon located in the top panel and right click on it. Wired Connection 1 is now an option right click on it. The system will now change from the previous interface configuration the the new one.Tip : To verify the changes issue the ifconfig command.
  8. The last and perhaps most important step is to go back in to Edit Connections… and unchecked the Connect automatically option on Auto eth0 which is the previous faulty Ubuntu configuration. Failure to do so will result in the Auto eth0 taking over the new configuration on the next reboot.

Wednesday, August 26, 2009

Easy Way To Schedule And Automate Tasks In Ubuntu

Easy Way To Schedule And Automate Tasks In Ubuntu – Make Tech Easier

Gnome-schedule is an application that provides an easy way for anyone to schedule (and automate
) tasks on their computers. It provides a simple graphical user interfacethat uses cron and at command to manage the crontab file. Be it scheduling a recurrent task or task that happens only once, Gnome-schedule has no problem in handling it.

gnome-schedule

Some of the useful features found in Gnome-schedule include:

  • Custom titles and icons for your tasks so that they can be organized and managed more easily.
  • Templates support so that you won't have to create the same task again and again
  • An Advanced mode for crontab experts
  • A calendar for you to choose the day you want a task to be executed
  • Easy dropdown selection of the date and time (so that you don't have to learn the "0 * * *" crontab instruction
  • If run as root, you can edit any user's crontab and "at" tasks, and also run tasks that require root permission.

Installing Gnome-schedule

Gnome-schedule is already included in the Ubuntu repository. To install, simply run the command

sudo apt-get install gnome-schedule

Once installed, go to System -> Preferences -> Scheduled tasks. This will open Gnome-schedule configuration window.

gnome-schedule

To create a new task, select New. Choose whether it is a recurrent or a one-time task.

gnome-schedule-new-task

For one-time task, enter the task's description, date and time of execution and the execution command.

Click Add to add the task to the crontab, or Add as template for future reference.

gnome-schedule-new-task2

For recurrent task, enter the description, command and the frequency of execution. The Advanced option allows you to edit the execution frequency in greater details.

gnome-schedule-recurrent-task

gnome-schedule-advanced (Advanced mode)

To create template tasks, click Templates, followed by New.Select between a recurrent or one-time task and enter the description and command.

To run Gnome-schedule as root, simply type

gksu gnome-schedule

In the configuration window, you can now see a new option "Change User". Clicking on it will allow you to modify other user's crontab and at task.

gnome-schedule-root

Saturday, August 22, 2009

New Virtual Private School

New Virtual Private School

August 21, 2009

Virtual K-12 school operator Connections Academy has launched a virtual private school called National Connections Academy (NaCA). Enrollment in NaCA for the 2009 fall semester will close on August 26th.

National Connections Academy is an accredited, online private school serving students in grades K-12 throughout the United States. NaCA's private school brings the classroom to the student with a combination of computer-based curriculum, real-time instruction, and course materials from leading publishers.

Offering both full- and part-time options, NaCA is suitable for students who want either a complete virtual school education or those interested in taking individual courses. In addition, NaCA offers a special "high school to college" program with American Public University that allows NaCA students to earn both a high school diploma and an associate degree in a total of four years.

Learning from home, NaCA students will work closely with their parents, or another "Learning Coach" and a teacher using detailed daily lesson plans that can be personalized to meet individual student needs. Teachers offer expertise, encouragement, and support and handle instruction, grading and testing - just as they would in a traditional classroom.

Free online information sessions are taking place Friday, August 21st through
Wednesday, August 26th.

For more information, visit www.NationalConnectionsAcademy.com.

Fix and Get the Best Firefox Font in Ubuntu

Fix and Get the Best Firefox Font in Linux | Ubuntu Site

  1. Install Microsoft fonts:
    sudo apt-get install msttcorefonts
    Log out and log in back. If you do not want to logout, the Font cache can be reloaded wit the command:
    sudo fc-cache -fv
  2. Download this file, extract it to /home/$username/.fonts

If the directory doesn't exist, just create it and paste all the contents there. To make it available for use to Firefox, then just do a right-click on your desktop click on change background themes, click the font tab and use the extracted file. It should look something like this.

font%20settings Fix and Get the Best Firefox Font in Linux

Check now your Firefox's font rendering. Here's mine.

Before:

before%20font Fix and Get the Best Firefox Font in Linux

After:

after%20font Fix and Get the Best Firefox Font in Linux

Thursday, August 20, 2009

Webcam on Ubuntu


Many webcams will "just work" in Ubuntu. There is a USB standard that defines USB streaming video called UVC. This stands for Universal Video Class, and it does for webcams what UMS does for USB memory sticks and hard drives. This allows one driver to work with many webcams. When looking to purchase a webcam for use with Ubuntu, you should look for a UVC compatible camera. The Linux-UVC project has a good list of UVC compatible webcams as well as The Quickcam Team for Logitech cameras.

Featured Post

Windows和Ubuntu双系统完全独立的安装方法

http://www.ubuntuhome.com/windows-and-ubuntu-install.html  | Ubuntu Home Posted by Snow on 2012/06/25 安装Windows和Ubuntu双系统时,很多人喜欢先安装windows,然...